Simple Android Bluetooth Application with Arduino Example
Apr 23, 2016 By justin bauer
This article will detail how to make a simple bluetooth application using Android Studio and demo it using an Arduino to toggle an LED and send data back-and-forth. No prior knowledge of Android development is needed, however it will help to know some basics of Java programming. I will be using an Android phone for testing purposes and not an Android virtual device. The Android app that you develop can be used with any other microcontroller, I only used the Arduino in this example with the HC-06 bluetooth module since they are both cheap and popular. I'm going to be creating other posts with different microcontrollers that use this same phone app. Some of the funtionality that I will be using was taken from the offical bluetooth SDK doc. I also derived some ideas from this blog post.
Android Development
Install and Setup
If you haven't already, download and install the Android IDE and SDK.
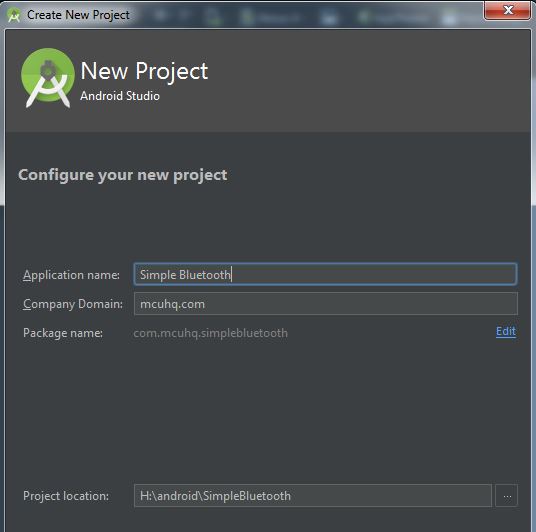
- Create a new project by navigating to "File->New Project"
- I named my project "Simple Bluetooth" and my company domain as "mcuhq.com".
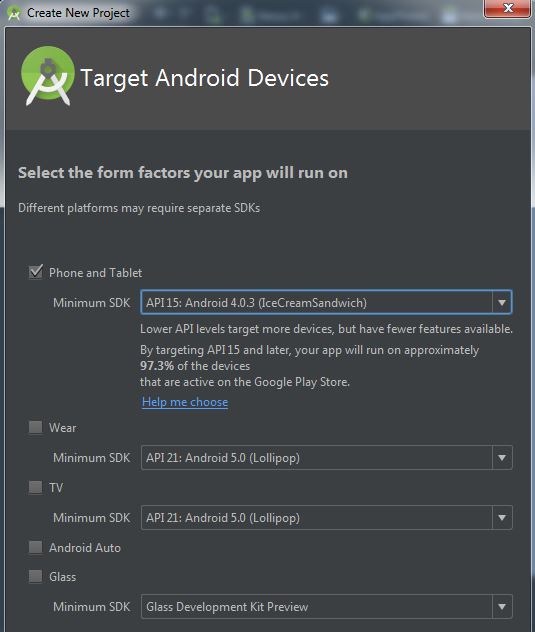
- The minimum API version was auto-selected to be at 15 for me at the time of writting which covers 97.3% of all devices on the market (pretty good coverage I'd say). Leave all of the other checkboxs blank since we won't be needing them.
- Select the "Empty Activity"

- Keep the Activity Name default as
MainActivity.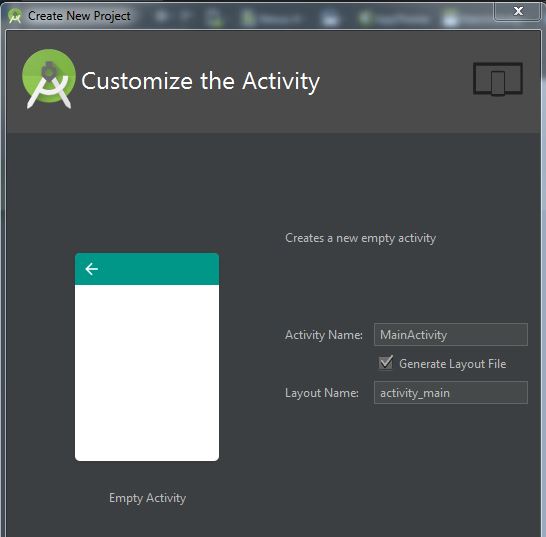
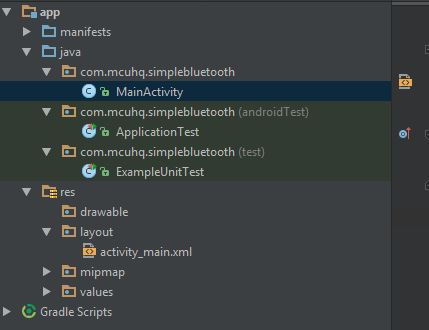
- Your project will now be created. It should look something like this:
GUI layout
I will be making the GUI layout first since it is easier to grasp what we are trying to do via the visual elements. The GUI builder has similarities such as anchors and layout managers similar to Java Swing. We will be using the LinearLayout (Vertical) to make our application. Without a layout manager, your GUI components would arrange themselves differently depending on the screen size of the device. The default layout choice is the RelativeLayout and works by aligning all of the components in relation to the first component placed on the screen (or as dictated by you). You can see this effect by opening activity_main.xml found in your app/res/layout folder structure and dragging a text component onto the screen. Notice how a green line indicates its anchor relationship.
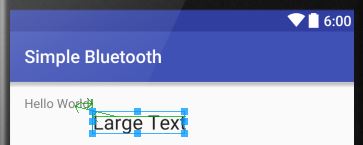
Moving the default Hello World! text will now move the text that you just placed. Making an app using this RelativeLayout is straightforward and easy, but often causes headaches with larger or smaller screens than the one you are developing on.
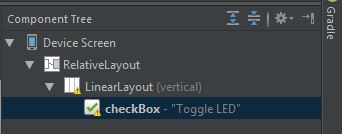
Drag the LinearLayout (Vertical) from the Palette to the component tree. Then drag a checkbox from the Palette to your main activity screen and double-click on it to call it "Toggle LED". Align it in the middle of the screen. This checkbox will be used to turn ON and OFF an LED on the Arduino. Your Component screen should now look like th
This next portion will be easier to accomplish and convey by just editing the markup XML from the designer. You can view this by clicking on the lower-left hand side of the viewport where it says "Text"
Paste this entire text into your activity_main.xml.
If your activity or project name differs from mine, you may need to adjust the
tools:contextvalue in the XML to match your settings. This should be highlighted in red inside the IDE
<?xml version="1.0" encoding="utf-8"?>
<RelativeLayout xmlns:android="http://schemas.android.com/apk/res/android"
    xmlns:tools="http://schemas.android.com/tools"
    android:layout_width="match_parent"
    android:layout_height="match_parent"
    android:paddingBottom="@dimen/activity_vertical_margin"
    android:paddingLeft="@dimen/activity_horizontal_margin"
    android:paddingRight="@dimen/activity_horizontal_margin"
    android:paddingTop="@dimen/activity_vertical_margin"
    tools:context="com.mcuhq.simplebluetooth.MainActivity">


    <LinearLayout
        android:orientation="vertical"
        android:layout_width="match_parent"
        android:layout_height="match_parent">

        <CheckBox
            android:layout_width="wrap_content"
            android:layout_height="wrap_content"
            android:text="Toggle LED"
            android:id="@+id/checkboxLED1"
            android:layout_marginTop="10dp"
            android:checked="false"
            android:layout_alignLeft="@+id/bluetoothStatus"
            android:layout_alignStart="@+id/bluetoothStatus"
            android:scaleX="1.7"
            android:scaleY="1.7"
            android:textStyle="bold"
            android:layout_gravity="center_horizontal" />

        <LinearLayout
            android:orientation="horizontal"
            android:layout_width="match_parent"
            android:layout_marginTop="10dp"
            android:layout_height="wrap_content">
            <TextView
                android:layout_width="wrap_content"
                android:layout_height="wrap_content"
                android:layout_weight="0.1"
                android:text="RX:"
                android:ellipsize="end"
                android:maxLines="1"
                android:textStyle="bold" />
            <TextView
                android:layout_width="wrap_content"
                android:layout_height="wrap_content"
                android:layout_weight="0.9"
                android:ellipsize="end"
                android:maxLines="1"
                android:text="<Read Buffer>"
                android:id="@+id/readBuffer"
                android:layout_centerHorizontal="true" />
        </LinearLayout>

        <LinearLayout
            android:orientation="horizontal"
            android:layout_width="match_parent"
            android:layout_height="wrap_content">
            <TextView
                android:layout_width="wrap_content"
                android:layout_height="wrap_content"
                android:layout_weight="0.1"
                android:text="Status:"
                android:ellipsize="end"
                android:maxLines="1"
                android:textStyle="bold" />
            <TextView
                android:layout_width="wrap_content"
                android:layout_height="wrap_content"
                android:layout_weight="0.9"

                android:text="<Bluetooth Status>"
                android:id="@+id/bluetoothStatus"
                android:ellipsize="end"
                android:maxLines="1"
                android:layout_centerHorizontal="true"
                android:layout_alignTop="@+id/checkboxLED1" />
        </LinearLayout>

        <Button
            android:layout_width="match_parent"
            android:layout_height="wrap_content"
            android:text="Bluetooth ON"
            android:id="@+id/scan"
            android:layout_centerVertical="true"
            android:layout_toStartOf="@+id/off" />

        <Button
            android:layout_width="match_parent"
            android:layout_height="wrap_content"
            android:text="Bluetooth OFF"
            android:id="@+id/off"
            android:layout_alignBottom="@+id/scan"
            android:layout_toEndOf="@+id/PairedBtn"
            android:layout_toRightOf="@+id/PairedBtn" />

        <Button
            android:layout_width="match_parent"
            android:layout_height="wrap_content"
            android:text="Show paired Devices"
            android:id="@+id/PairedBtn"
            android:layout_below="@+id/scan"
            android:layout_toStartOf="@+id/discover" />

        <Button
            android:layout_width="match_parent"
            android:layout_height="wrap_content"
            android:text="Discover New Devices"
            android:id="@+id/discover"
            android:layout_below="@+id/off"
            android:layout_toRightOf="@+id/checkboxLED1"
            android:layout_toEndOf="@+id/checkboxLED1" />

        <ListView
            android:layout_width="wrap_content"
            android:layout_height="wrap_content"
            android:id="@+id/devicesListView"
            android:choiceMode="singleChoice"
            android:layout_below="@+id/PairedBtn"
            android:layout_alignRight="@+id/off"
            android:layout_alignEnd="@+id/off" />

    </LinearLayout>

</RelativeLayout>
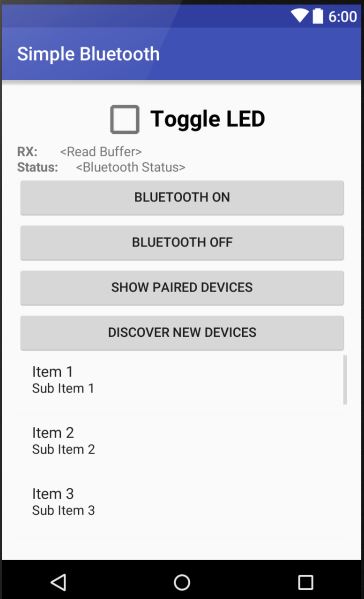
Flip back to the designer and you should see the following:
Lets go over what every function does and how we were able to make the GUI look like it does:
Checkbox
Nothing difficult here, but note how I used scaleX and scaleY to make this appear larger than the default size
<CheckBox
    android:layout_width="wrap_content"
    android:layout_height="wrap_content"
    android:text="Toggle LED"
    android:id="@+id/checkboxLED1"
    android:layout_marginTop="10dp"
    android:checked="false"
    android:layout_alignLeft="@+id/bluetoothStatus"
    android:layout_alignStart="@+id/bluetoothStatus"
    android:scaleX="1.7"
    android:scaleY="1.7"
    android:textStyle="bold"
    android:layout_gravity="center_horizontal" />
RX Read Buffer
Here is where the data that we receive from the Arduino will be displayed. The demo code on the Arduino will be simply incrementing a 32-bit counter variable.
<LinearLayout
    android:orientation="horizontal"
    android:layout_width="match_parent"
    android:layout_marginTop="10dp"
    android:layout_height="wrap_content">
        <TextView
            android:layout_width="wrap_content"
            android:layout_height="wrap_content"
            android:layout_weight="0.1"
            android:text="RX:"
            android:ellipsize="end"
            android:maxLines="1"
            android:textStyle="bold" />
        <TextView
            android:layout_width="wrap_content"
            android:layout_height="wrap_content"
            android:layout_weight="0.9"
            android:ellipsize="end"
            android:maxLines="1"
            android:text="<Read Buffer>"
            android:id="@+id/readBuffer"
            android:layout_centerHorizontal="true" />
    </LinearLayout>
Note that I used a horizontal linear layout for two textviews. This was inspired by this SO post. These two textviews will be on the same line, side-by-side, and fill the horizontal width of your phone. The RX: label will fill 10% of the width with the rest going to be displaying the received data.
Bluetooth Status
This horizontal line contains the status of the bluetooth radio on your phone. It will indicate if its on, off, connecting to a device, or if a connection failed. The code is formated exactly as above the RX Read Buffer.
<LinearLayout
    android:orientation="horizontal"
    android:layout_width="match_parent"
    android:layout_height="wrap_content">
        <TextView
            android:layout_width="wrap_content"
            android:layout_height="wrap_content"
            android:layout_weight="0.1"
            android:text="Status:"
            android:ellipsize="end"
            android:maxLines="1"
            android:textStyle="bold" />
        <TextView
            android:layout_width="wrap_content"
            android:layout_height="wrap_content"
            android:layout_weight="0.9"

            android:text="<Bluetooth Status>"
            android:id="@+id/bluetoothStatus"
            android:ellipsize="end"
            android:maxLines="1"
            android:layout_centerHorizontal="true"
            android:layout_alignTop="@+id/checkboxLED1" />
    </LinearLayout>
Bluetooth ON/OFF buttons
These buttons will turn the Bluetooth radio ON or OFF
   <Button
        android:layout_width="match_parent"
        android:layout_height="wrap_content"
        android:text="Bluetooth ON"
        android:id="@+id/scan"
        android:layout_centerVertical="true"
        android:layout_toStartOf="@+id/off" />
    <Button
        android:layout_width="match_parent"
        android:layout_height="wrap_content"
        android:text="Bluetooth OFF"
        android:id="@+id/off"
        android:layout_alignBottom="@+id/scan"
        android:layout_toEndOf="@+id/PairedBtn"
        android:layout_toRightOf="@+id/PairedBtn" />
Show Paired Devices button
This will populate the list with devices that your phone already has paired in the past
<Button
    android:layout_width="match_parent"
    android:layout_height="wrap_content"
    android:text="Show paired Devices"
    android:id="@+id/PairedBtn"
    android:layout_below="@+id/scan"
    android:layout_toStartOf="@+id/discover" />
Discover Button
Pressing this button will place your bluetooth module in discovery mode while it seeks out devices it can pair to.
<Button
    android:layout_width="match_parent"
    android:layout_height="wrap_content"
    android:text="Discover New Devices"
    android:id="@+id/discover"
    android:layout_below="@+id/off"
    android:layout_toRightOf="@+id/checkboxLED1"
    android:layout_toEndOf="@+id/checkboxLED1" />
Devices View
This scroll box is called a ListView and will contain the devices that were previously paired or are currently being discovered.
<ListView
    android:layout_width="wrap_content"
    android:layout_height="wrap_content"
    android:id="@+id/devicesListView"
    android:choiceMode="singleChoice"
    android:layout_below="@+id/PairedBtn"
    android:layout_alignRight="@+id/off"
    android:layout_alignEnd="@+id/off" />
That's it for the GUI side of things. Now we are going to write Java to interact with our components. Please note that the code be referencing the GUI via each component's ID.
Program Permissions
You should have probably noticed by now that downloading certain apps onto your phone will display their requirements such as being able to access your contacts, email client, etc. We need to do the same thing to our app and tell the user that this application will require access to the bluetooth module. Open your AndroidManifest.xml file and paste the following in the root of the manifest node.
<uses-permission android:name="android.permission.BLUETOOTH" />
<uses-permission android:name="android.permission.BLUETOOTH_ADMIN" />
<uses-permission android:name="android.permission.ACCESS_FINE_LOCATION" />
<uses-permission android:name="android.permission.ACCESS_COARSE_LOCATION" />

<permission android:name="android.permission.BLUETOOTH" android:label="BLUETOOTH" />
<permission android:name="android.permission.BLUETOOTH_ADMIN" />
<permission android:name="android.permission.ACCESS_FINE_LOCATION" />
<permission android:name="android.permission.ACCESS_COARSE_LOCATION" />
For Android 6.0 and above, I had to include the location permission in order to be able to scan for bluetooth devices.
Java
I made the entire program in one class called MainActivity for simplicity. In future programs, it is probably good practice to separate the logic such as bluetooth discovery and application code into their own activity file. For now I merged them all into one.
For the impatient, You can paste the following code into your MainActivity.java file. You may need to change the package name and such if you did not use my default settings as above. I will attempt to explain what the code does as well.
package com.mcuhq.simplebluetooth;

import android.bluetooth.BluetoothAdapter;
import android.bluetooth.BluetoothDevice;
import android.bluetooth.BluetoothSocket;
import android.content.BroadcastReceiver;
import android.content.Context;
import android.content.Intent;
import android.content.IntentFilter;
import android.os.Handler;
import android.os.SystemClock;
import android.support.v7.app.AppCompatActivity;
import android.os.Bundle;
import android.view.View;
import android.widget.AdapterView;
import android.widget.ArrayAdapter;
import android.widget.Button;
import android.widget.CheckBox;
import android.widget.ListView;
import android.widget.TextView;
import android.widget.Toast;

import java.io.IOException;
import java.io.InputStream;
import java.io.OutputStream;
import java.io.UnsupportedEncodingException;
import java.util.Set;
import java.util.UUID;

public class MainActivity extends AppCompatActivity {

    // GUI Components
    private TextView mBluetoothStatus;
    private TextView mReadBuffer;
    private Button mScanBtn;
    private Button mOffBtn;
    private Button mListPairedDevicesBtn;
    private Button mDiscoverBtn;
    private BluetoothAdapter mBTAdapter;
    private Set<BluetoothDevice> mPairedDevices;
    private ArrayAdapter<String> mBTArrayAdapter;
    private ListView mDevicesListView;
    private CheckBox mLED1;

    private Handler mHandler; // Our main handler that will receive callback notifications
    private ConnectedThread mConnectedThread; // bluetooth background worker thread to send and receive data
    private BluetoothSocket mBTSocket = null; // bi-directional client-to-client data path

    private static final UUID BTMODULEUUID = UUID.fromString("00001101-0000-1000-8000-00805F9B34FB"); // "random" unique identifier


    // #defines for identifying shared types between calling functions
    private final static int REQUEST_ENABLE_BT = 1; // used to identify adding bluetooth names
    private final static int MESSAGE_READ = 2; // used in bluetooth handler to identify message update
    private final static int CONNECTING_STATUS = 3; // used in bluetooth handler to identify message status


    @Override
    protected void onCreate(Bundle savedInstanceState) {
        super.onCreate(savedInstanceState);
        setContentView(R.layout.activity_main);

        mBluetoothStatus = (TextView)findViewById(R.id.bluetoothStatus);
        mReadBuffer = (TextView) findViewById(R.id.readBuffer);
        mScanBtn = (Button)findViewById(R.id.scan);
        mOffBtn = (Button)findViewById(R.id.off);
        mDiscoverBtn = (Button)findViewById(R.id.discover);
        mListPairedDevicesBtn = (Button)findViewById(R.id.PairedBtn);
        mLED1 = (CheckBox)findViewById(R.id.checkboxLED1);

        mBTArrayAdapter = new ArrayAdapter<String>(this,android.R.layout.simple_list_item_1);
        mBTAdapter = BluetoothAdapter.getDefaultAdapter(); // get a handle on the bluetooth radio

        mDevicesListView = (ListView)findViewById(R.id.devicesListView);
        mDevicesListView.setAdapter(mBTArrayAdapter); // assign model to view
        mDevicesListView.setOnItemClickListener(mDeviceClickListener);


        mHandler = new Handler(){
            public void handleMessage(android.os.Message msg){
                if(msg.what == MESSAGE_READ){
                    String readMessage = null;
                    try {
                        readMessage = new String((byte[]) msg.obj, "UTF-8");
                    } catch (UnsupportedEncodingException e) {
                        e.printStackTrace();
                    }
                    mReadBuffer.setText(readMessage);
                }

                if(msg.what == CONNECTING_STATUS){
                    if(msg.arg1 == 1)
                        mBluetoothStatus.setText("Connected to Device: " + (String)(msg.obj));
                    else
                        mBluetoothStatus.setText("Connection Failed");
                }
            }
        };

        if (mBTArrayAdapter == null) {
            // Device does not support Bluetooth
            mBluetoothStatus.setText("Status: Bluetooth not found");
            Toast.makeText(getApplicationContext(),"Bluetooth device not found!",Toast.LENGTH_SHORT).show();
        }
        else {

            mLED1.setOnClickListener(new View.OnClickListener(){
                @Override
                public void onClick(View v){
                    if(mConnectedThread != null) //First check to make sure thread created
                        mConnectedThread.write("1");
                }
            });


            mScanBtn.setOnClickListener(new View.OnClickListener() {
                @Override
                public void onClick(View v) {
                    bluetoothOn(v);
                }
            });

            mOffBtn.setOnClickListener(new View.OnClickListener(){
                @Override
                public void onClick(View v){
                    bluetoothOff(v);
                }
            });

            mListPairedDevicesBtn.setOnClickListener(new View.OnClickListener() {
                @Override
                public void onClick(View v){
                    listPairedDevices(v);
                }
            });

            mDiscoverBtn.setOnClickListener(new View.OnClickListener(){
                @Override
                public void onClick(View v){
                    discover(v);
                }
            });
        }
    }

    private void bluetoothOn(View view){
        if (!mBTAdapter.isEnabled()) {
            Intent enableBtIntent = new Intent(BluetoothAdapter.ACTION_REQUEST_ENABLE);
            startActivityForResult(enableBtIntent, REQUEST_ENABLE_BT);
            mBluetoothStatus.setText("Bluetooth enabled");
            Toast.makeText(getApplicationContext(),"Bluetooth turned on",Toast.LENGTH_SHORT).show();

        }
        else{
            Toast.makeText(getApplicationContext(),"Bluetooth is already on", Toast.LENGTH_SHORT).show();
        }
    }

    // Enter here after user selects "yes" or "no" to enabling radio
    @Override
    protected void onActivityResult(int requestCode, int resultCode, Intent Data){
        // Check which request we're responding to
        if (requestCode == REQUEST_ENABLE_BT) {
            // Make sure the request was successful
            if (resultCode == RESULT_OK) {
                // The user picked a contact.
                // The Intent's data Uri identifies which contact was selected.
                mBluetoothStatus.setText("Enabled");
            }
            else
                mBluetoothStatus.setText("Disabled");
        }
    }

    private void bluetoothOff(View view){
        mBTAdapter.disable(); // turn off
        mBluetoothStatus.setText("Bluetooth disabled");
        Toast.makeText(getApplicationContext(),"Bluetooth turned Off", Toast.LENGTH_SHORT).show();
    }

    private void discover(View view){
        // Check if the device is already discovering
        if(mBTAdapter.isDiscovering()){
            mBTAdapter.cancelDiscovery();
            Toast.makeText(getApplicationContext(),"Discovery stopped",Toast.LENGTH_SHORT).show();
        }
        else{
            if(mBTAdapter.isEnabled()) {
                mBTArrayAdapter.clear(); // clear items
                mBTAdapter.startDiscovery();
                Toast.makeText(getApplicationContext(), "Discovery started", Toast.LENGTH_SHORT).show();
                registerReceiver(blReceiver, new IntentFilter(BluetoothDevice.ACTION_FOUND));
            }
            else{
                Toast.makeText(getApplicationContext(), "Bluetooth not on", Toast.LENGTH_SHORT).show();
            }
        }
    }

    final BroadcastReceiver blReceiver = new BroadcastReceiver() {
        @Override
        public void onReceive(Context context, Intent intent) {
            String action = intent.getAction();
            if(BluetoothDevice.ACTION_FOUND.equals(action)){
                BluetoothDevice device = intent.getParcelableExtra(BluetoothDevice.EXTRA_DEVICE);
                // add the name to the list
                mBTArrayAdapter.add(device.getName() + "\n" + device.getAddress());
                mBTArrayAdapter.notifyDataSetChanged();
            }
        }
    };

    private void listPairedDevices(View view){
        mPairedDevices = mBTAdapter.getBondedDevices();
        if(mBTAdapter.isEnabled()) {
            // put it's one to the adapter
            for (BluetoothDevice device : mPairedDevices)
                mBTArrayAdapter.add(device.getName() + "\n" + device.getAddress());

            Toast.makeText(getApplicationContext(), "Show Paired Devices", Toast.LENGTH_SHORT).show();
        }
        else
            Toast.makeText(getApplicationContext(), "Bluetooth not on", Toast.LENGTH_SHORT).show();
    }

    private AdapterView.OnItemClickListener mDeviceClickListener = new AdapterView.OnItemClickListener() {
        public void onItemClick(AdapterView<?> av, View v, int arg2, long arg3) {

            if(!mBTAdapter.isEnabled()) {
                Toast.makeText(getBaseContext(), "Bluetooth not on", Toast.LENGTH_SHORT).show();
                return;
            }

            mBluetoothStatus.setText("Connecting...");
            // Get the device MAC address, which is the last 17 chars in the View
            String info = ((TextView) v).getText().toString();
            final String address = info.substring(info.length() - 17);
            final String name = info.substring(0,info.length() - 17);

            // Spawn a new thread to avoid blocking the GUI one
            new Thread()
            {
                public void run() {
                    boolean fail = false;

                    BluetoothDevice device = mBTAdapter.getRemoteDevice(address);

                    try {
                        mBTSocket = createBluetoothSocket(device);
                    } catch (IOException e) {
                        fail = true;
                        Toast.makeText(getBaseContext(), "Socket creation failed", Toast.LENGTH_SHORT).show();
                    }
                    // Establish the Bluetooth socket connection.
                    try {
                        mBTSocket.connect();
                    } catch (IOException e) {
                        try {
                            fail = true;
                            mBTSocket.close();
                            mHandler.obtainMessage(CONNECTING_STATUS, -1, -1)
                                    .sendToTarget();
                        } catch (IOException e2) {
                            //insert code to deal with this
                            Toast.makeText(getBaseContext(), "Socket creation failed", Toast.LENGTH_SHORT).show();
                        }
                    }
                    if(fail == false) {
                        mConnectedThread = new ConnectedThread(mBTSocket);
                        mConnectedThread.start();

                        mHandler.obtainMessage(CONNECTING_STATUS, 1, -1, name)
                                .sendToTarget();
                    }
                }
            }.start();
        }
    };

    private BluetoothSocket createBluetoothSocket(BluetoothDevice device) throws IOException {
        return  device.createRfcommSocketToServiceRecord(BTMODULEUUID);
        //creates secure outgoing connection with BT device using UUID
    }

    private class ConnectedThread extends Thread {
        private final BluetoothSocket mmSocket;
        private final InputStream mmInStream;
        private final OutputStream mmOutStream;

        public ConnectedThread(BluetoothSocket socket) {
            mmSocket = socket;
            InputStream tmpIn = null;
            OutputStream tmpOut = null;

            // Get the input and output streams, using temp objects because
            // member streams are final
            try {
                tmpIn = socket.getInputStream();
                tmpOut = socket.getOutputStream();
            } catch (IOException e) { }

            mmInStream = tmpIn;
            mmOutStream = tmpOut;
        }

        public void run() {
            byte[] buffer = new byte[1024];  // buffer store for the stream
            int bytes; // bytes returned from read()
            // Keep listening to the InputStream until an exception occurs
            while (true) {
                try {
                    // Read from the InputStream
                    bytes = mmInStream.available();
                    if(bytes != 0) {
                        SystemClock.sleep(100); //pause and wait for rest of data. Adjust this depending on your sending speed.
                        bytes = mmInStream.available(); // how many bytes are ready to be read?
                        bytes = mmInStream.read(buffer, 0, bytes); // record how many bytes we actually read
                        mHandler.obtainMessage(MESSAGE_READ, bytes, -1, buffer)
                                .sendToTarget(); // Send the obtained bytes to the UI activity
                    }
                } catch (IOException e) {
                    e.printStackTrace();

                    break;
                }
            }
        }

        /* Call this from the main activity to send data to the remote device */
        public void write(String input) {
            byte[] bytes = input.getBytes();           //converts entered String into bytes
            try {
                mmOutStream.write(bytes);
            } catch (IOException e) { }
        }

        /* Call this from the main activity to shutdown the connection */
        public void cancel() {
            try {
                mmSocket.close();
            } catch (IOException e) { }
        }
    }
}
All of my class variables are prefaced with an
mcharacter used to designate that it is a class member.
Member Variables
We will be grabbing a reference to the GUI components to listen to their onClick events and to update their text values throughout our class. I made them all class members so they can be referenced anywhere inside the class without needing to get the reference multiple times.
// GUI Components
private TextView mBluetoothStatus;
private TextView mReadBuffer;
private Button mScanBtn;
private Button mOffBtn;
private Button mListPairedDevicesBtn;
private Button mDiscoverBtn;
private BluetoothAdapter mBTAdapter;
private BluetoothSocket mBTSocket = null;
private Set<BluetoothDevice> mPairedDevices;
private ArrayAdapter<String> mBTArrayAdapter;
private ListView mDevicesListView;
private CheckBox mLED1;
A Handler type is also created so that our application can communicate back with the main running thread with updates such as bluetooth status and any received data from our Arduino. Each application will have a main thread typicalled called the "GUI" thread in which all updates to your screen are performed. You don't want to push to much work to this thread or poll for an event (called "blocking") because then your screen will become unresponsive. You can read more about this here.
We will create a handler that receives data from our background threads and updates our GUI components. A separate background worker thread called mConnectedThread will be used to receive and send data to our bluetooth device. This thread will NOT run on our main thread and so it can block and handle large amount of requests without creating a sluggish effect on our GUI. Our threads can pass data to one another, however they need to know what the data type is so it can be casted appropriately. Simply use some constants to identify these.
Finally, the mBTSocket is the data path layer needed to send and receive data as a client to our HC-06 device.
private Handler mHandler; // Our main handler that will receive callback notifications
private ConnectedThread mConnectedThread; // bluetooth background worker thread to send and receive data
private BluetoothSocket mBTSocket = null; // bi-directional client-to-client data path

// #defines for identifying shared types between calling functions
private final static int REQUEST_ENABLE_BT = 1; // used to identify adding bluetooth names
private final static int MESSAGE_READ = 2; // used in bluetooth handler to identify message update
private final static int CONNECTING_STATUS = 3; // used in bluetooth handler to identify message status
onCreate
Every activity has an onCreate method that gets called. We will "override" the default functionality and place in our own. First, we gather our components, selecting them via their IDs from the GUI. We cast them to the type we expect.
@Override
    protected void onCreate(Bundle savedInstanceState) {
    super.onCreate(savedInstanceState);
        setContentView(R.layout.activity_main);

        bluetoothStatus = (TextView)findViewById(R.id.bluetoothStatus);
        mReadBuffer = (TextView) findViewById(R.id.readBuffer);
        scanBtn = (Button)findViewById(R.id.scan);
        offBtn = (Button)findViewById(R.id.off);
        discoverBtn = (Button)findViewById(R.id.discover);
        listPairedDevicesBtn = (Button)findViewById(R.id.PairedBtn);
        mLED1 = (CheckBox)findViewById(R.id.checkboxLED1);;
The following creates a listView to contain our bluetooth devices. An ArrayAdapter is set onto the listView so that all items in this array will reflect on the GUI. You can think of this as setting the model to the view with the model being the arrayAdapter and the view being the listView. The BluetoothAdapter class variable represents the local device Bluetooth adapter that will be used for bluetooth tasks such as discovery and connection.
mBTArrayAdapter = new ArrayAdapter<String>(this,android.R.layout.simple_list_item_1);
mBTAdapter = BluetoothAdapter.getDefaultAdapter(); // get a handle on the bluetooth radio

mDevicesListView = (ListView)findViewById(R.id.devicesListView);
mDevicesListView.setAdapter(mBTArrayAdapter); // assign model to view
mDevicesListView.setOnItemClickListener(mDeviceClickListener);
GUI Handler
This function will be called from our bluetooth ConnectedThread thread and another thread that handles the discovery stage. Recall that all GUI updates should be performed in the GUI thread.
mHandler = new Handler(){
    public void handleMessage(android.os.Message msg){
        if(msg.what == MESSAGE_READ){
            String readMessage = null;
            try {
                readMessage = new String((byte[]) msg.obj, "UTF-8");
            } catch (UnsupportedEncodingException e) {
                e.printStackTrace();
            }
            mReadBuffer.setText(readMessage);
        }

        if(msg.what == CONNECTING_STATUS){
            if(msg.arg1 == 1)
                mBluetoothStatus.setText("Connected to Device: " + (String)(msg.obj));
            else
                mBluetoothStatus.setText("Connection Failed");
        }
    }
};
Button listeners
A quick check will be made to ensure that your phone has bluetooth capability. If it does, then actions are assigned to each button's click event. The
if (mBTArrayAdapter == null) {
    // Device does not support Bluetooth
    mBluetoothStatus.setText("Status: Bluetooth not found");
    Toast.makeText(getApplicationContext(),"Bluetooth device not found!",Toast.LENGTH_SHORT).show();
}
else {

    mLED1.setOnClickListener(new View.OnClickListener(){
        @Override
        public void onClick(View v){
            if(mConnectedThread != null) //First check to make sure thread created
                mConnectedThread.write("1");
        }
    });


    mScanBtn.setOnClickListener(new View.OnClickListener() {
        @Override
        public void onClick(View v) {
            bluetoothOn(v);
        }
    });

    mOffBtn.setOnClickListener(new View.OnClickListener(){
        @Override
        public void onClick(View v){
            bluetoothOff(v);
        }
    });

    mListPairedDevicesBtn.setOnClickListener(new View.OnClickListener() {
        @Override
        public void onClick(View v){
            listPairedDevices(v);
        }
    });

    mDiscoverBtn.setOnClickListener(new View.OnClickListener(){
        @Override
        public void onClick(View v){
            discover(v);
        }
    });
Bluetooth ON and OFF
The
Toastclass provides an easy way to display quick notifications in Android. The following code is pretty straight forward. The android bluetooth docs cover the basics on turning ON/OFF and discover of bluetooth devices
private void bluetoothOn(View view){
    if (!mBTAdapter.isEnabled()) {
        Intent enableBtIntent = new Intent(BluetoothAdapter.ACTION_REQUEST_ENABLE);
        startActivityForResult(enableBtIntent, REQUEST_ENABLE_BT);
        mBluetoothStatus.setText("Bluetooth enabled");
        Toast.makeText(getApplicationContext(),"Bluetooth turned on",Toast.LENGTH_SHORT).show();
    }
    else{
        Toast.makeText(getApplicationContext(),"Bluetooth is already on", Toast.LENGTH_SHORT).show();
    }
}

// Enter here after user selects "yes" or "no" to enabling radio
@Override
protected void onActivityResult(int requestCode, int resultCode, Intent Data){
    // Check which request we're responding to
    if (requestCode == REQUEST_ENABLE_BT) {
        // Make sure the request was successful
        if (resultCode == RESULT_OK) {
            // The user picked a contact.
            // The Intent's data Uri identifies which contact was selected.
            mBluetoothStatus.setText("Enabled");
        }
        else
            mBluetoothStatus.setText("Disabled");
    }
}

private void bluetoothOff(View view){
    mBTAdapter.disable(); // turn off
    mBluetoothStatus.setText("Bluetooth disabled");
    Toast.makeText(getApplicationContext(),"Bluetooth turned Off", Toast.LENGTH_SHORT).show();
}
A fine detail happens when you enable the bluetooth radio. The application must "listen" to the dialog box that is shown to the user. If the users clicks "no", we don't want to show the status that bluetooth is enabled. We use an Activity for this reason. As quoted from the Android bluetooth documentation:
"The REQUEST_ENABLE_BT constant passed to startActivityForResult() is a locally defined integer (which must be greater than 0), that the system passes back to you in your onActivityResult() implementation as the requestCode parameter. If enabling Bluetooth succeeds, your activity receives the RESULT_OK result code in the onActivityResult() callback. If Bluetooth was not enabled due to an error (or the user responded "No") then the result code is RESULT_CANCELED."
Discovering devices
During discovery, we will register a "listener" class that will update our listView by adding items to its model (the mBTArrayAdapter) once a notification is made that a bluetooth device was found.
registerReceiver(blReceiver, new IntentFilter(BluetoothDevice.ACTION_FOUND));
The rest of the code was lifted from the offical Android example code found here
private void discover(View view){
    // Check if the device is already discovering
    if(mBTAdapter.isDiscovering()){
        mBTAdapter.cancelDiscovery();
        Toast.makeText(getApplicationContext(),"Discovery stopped",Toast.LENGTH_SHORT).show();
    }
    else{
        if(mBTAdapter.isEnabled()) {
            mBTArrayAdapter.clear(); // clear items
            mBTAdapter.startDiscovery();
            Toast.makeText(getApplicationContext(), "Discovery started", Toast.LENGTH_SHORT).show();
            registerReceiver(blReceiver, new IntentFilter(BluetoothDevice.ACTION_FOUND));
        }
        else{
            Toast.makeText(getApplicationContext(), "Bluetooth not on", Toast.LENGTH_SHORT).show();
        }
    }
}

final BroadcastReceiver blReceiver = new BroadcastReceiver() {
    @Override
    public void onReceive(Context context, Intent intent) {
        String action = intent.getAction();
        if(BluetoothDevice.ACTION_FOUND.equals(action)){
            BluetoothDevice device = intent.getParcelableExtra(BluetoothDevice.EXTRA_DEVICE);
            // add the name to the list
            mBTAdapter.add(device.getName() + "\n" + device.getAddress());
            mBTArrayAdapter.notifyDataSetChanged();
        }
    }
};
Listing Paired Devices
This function uses some of the built-in functionality of our mBTAdapter in getting the already paired bluetooth devices.
private void listPairedDevices(View view){
    mPairedDevices = mBTAdapter.getBondedDevices();
    if(mBTAdapter.isEnabled()) {
        // put it's one to the adapter
        for (BluetoothDevice device : mPairedDevices)
            mBTArrayAdapter.add(device.getName() + "\n" + device.getAddress());

        Toast.makeText(getApplicationContext(), "Show Paired Devices", Toast.LENGTH_SHORT).show();
    }
    else
        Toast.makeText(getApplicationContext(), "Bluetooth not on", Toast.LENGTH_SHORT).show();
}
Connecting as a Client
We will need to open a data pipe, or socket, to our bluetooth device that is connected to the Arduino. We can do this by opening up a socket once we know its address. This functionality will happen once a device is "clicked" on your listView. Note that we don't want this time-consuming process to happen on the GUI thread as discussed previously, so lets use a background thread to open the socket and display its status to our GUI via the Handler function created above.
private AdapterView.OnItemClickListener mDeviceClickListener = new AdapterView.OnItemClickListener() {
    public void onItemClick(AdapterView<?> av, View v, int arg2, long arg3) {

        if(!mBTAdapter.isEnabled()) {
            Toast.makeText(getBaseContext(), "Bluetooth not on", Toast.LENGTH_SHORT).show();
            return;
        }

        mBluetoothStatus.setText("Connecting...");
        // Get the device MAC address, which is the last 17 chars in the View
        String info = ((TextView) v).getText().toString();
        final String address = info.substring(info.length() - 17);
        final String name = info.substring(0,info.length() - 17);

        // Spawn a new thread to avoid blocking the GUI one
        new Thread()
        {
            public void run() {
                boolean fail = false;

                BluetoothDevice device = mBTAdapter.getRemoteDevice(address);

                try {
                    mBTSocket = createBluetoothSocket(device);
                } catch (IOException e) {
                    fail = true;
                    Toast.makeText(getBaseContext(), "Socket creation failed", Toast.LENGTH_SHORT).show();
                }
                // Establish the Bluetooth socket connection.
                try {
                    mBTSocket.connect();
                } catch (IOException e) {
                    try {
                        fail = true;
                        mBTSocket.close();
                        mHandler.obtainMessage(CONNECTING_STATUS, -1, -1)
                                .sendToTarget();
                    } catch (IOException e2) {
                        //insert code to deal with this
                        Toast.makeText(getBaseContext(), "Socket creation failed", Toast.LENGTH_SHORT).show();
                    }
                }
                if(fail == false) {
                    mConnectedThread = new ConnectedThread(mBTSocket);
                    mConnectedThread.start();

                    mHandler.obtainMessage(CONNECTING_STATUS, 1, -1, name)
                            .sendToTarget();
                }
            }
        }.start();
    }
};
private BluetoothSocket createBluetoothSocket(BluetoothDevice device) throws IOException {
    return  device.createRfcommSocketToServiceRecord(BTMODULEUUID);
    //creates secure outgoing connection with BT device using UUID
}
The address and name of the device is retried from the listView. A new thread is created and an attempt is made to open the socket. If the call returns with IOException, update our GUI saying it failed. Else, continue and try to make a connection. If that fails, also report the error to our GUI status label. If all succeeds, create a new thread, mConnectedThread and pass it our socket connection to monitor our RX/TX tasks.
Note how we are sending data asynchronously back to our GUI thread via the mHandler instance. We can pass a series of integers and an object - in our case a string for the status label to update.
mHandler.obtainMessage(CONNECTING_STATUS, 1, -1, name).sendToTarget();
RX/TX Bluetooth Thread
This background worker thread example is slightly modified from the Android Docs. The most significant addition is a small delay of 100ms when receiving data. SystemClock.sleep(100);. I placed this delay in so that we will collect all of the data before posting to the main thread. Without a delay, the GUI would update after every byte received instead of the whole perceived payload. Our example is just reading a uint32 variable of 4 bytes. A more advanced routine may want to wait until a CRC is matched or special terminating character recieved such as a newline "\n".
private class ConnectedThread extends Thread {
    private final BluetoothSocket mmSocket;
    private final InputStream mmInStream;
    private final OutputStream mmOutStream;

    public ConnectedThread(BluetoothSocket socket) {
        mmSocket = socket;
        InputStream tmpIn = null;
        OutputStream tmpOut = null;

        // Get the input and output streams, using temp objects because
        // member streams are final
        try {
            tmpIn = socket.getInputStream();
            tmpOut = socket.getOutputStream();
        } catch (IOException e) { }

        mmInStream = tmpIn;
        mmOutStream = tmpOut;
    }

    public void run() {
        byte[] buffer = new byte[1024];  // buffer store for the stream
        int bytes; // bytes returned from read()
        // Keep listening to the InputStream until an exception occurs
        while (true) {
            try {
                // Read from the InputStream
                bytes = mmInStream.available();
                if(bytes != 0) {
                    SystemClock.sleep(100); //pause and wait for rest of data. Adjust this depending on your sending speed.
                    bytes = mmInStream.available(); // how many bytes are ready to be read?
                    bytes = mmInStream.read(buffer, 0, bytes); // record how many bytes we actually read
                    mHandler.obtainMessage(MESSAGE_READ, bytes, -1, buffer)
                            .sendToTarget(); // Send the obtained bytes to the UI activity
                }
            } catch (IOException e) {
                e.printStackTrace();

                break;
            }
        }
    }

    /* Call this from the main activity to send data to the remote device */
    public void write(String input) {
        byte[] bytes = input.getBytes();           //converts entered String into bytes
        try {
            mmOutStream.write(bytes);
        } catch (IOException e) { }
    }

    /* Call this from the main activity to shutdown the connection */
    public void cancel() {
        try {
            mmSocket.close();
        } catch (IOException e) { }
    }
}
Build and Run
Click the compile button to see if everything compiles. You will need to enable USB debugging on your phone in the developer options in order to directly run code on your phone. Test to verify that you can turn on the bluetooth radio, scan for devices, and view your previously paired devices.
Arduino Code
I've constructed a simple sketch that increments a 32-bit variable and sends it to the HC-06 bluetooth module. It also listens for a 1 to be received so it can toggle the onboard LED. To learn how to wire the HC-06 to the Arduino, please see http://mcuhq.com/26/arduino-uno-hc-06-simple-example-using-android-phone
Here is the sketch:
/**
 * Simple routine that performs the following:
 *  1. Configures the software UART on pins 2 and 4 (RX,TX)
 *  2. Increments a 32-bit variable every 500ms
 *  4. If it receives a '1' character from bluetooth, it toggles an LED
 *
 *  @author Justin Bauer - mcuhq.com
 *  @date 4.24.2016
 */

#include <SoftwareSerial.h> // use the software uart
SoftwareSerial bluetooth(2, 4); // RX, TX

unsigned long previousMillis = 0;        // will store last time
const long interval = 500;           // interval at which to delay
static uint32_t tmp; // increment this

void setup() {
  pinMode(13, OUTPUT); // for LED status
  bluetooth.begin(9600); // start the bluetooth uart at 9600 which is its default
  delay(200); // wait for voltage stabilize
  bluetooth.print("AT+NAMEmcuhq.com"); // place your name in here to configure the bluetooth name.
                                       // will require reboot for settings to take affect.
  delay(3000); // wait for settings to take affect.
}

void loop() {
  if (bluetooth.available()) { // check if anything in UART buffer
    if(bluetooth.read() == '1'){ // did we receive this character?
       digitalWrite(13,!digitalRead(13)); // if so, toggle the onboard LED
    }
  }

  unsigned long currentMillis = millis();
  if (currentMillis - previousMillis >= interval) {
    previousMillis = currentMillis;
    bluetooth.print(tmp++); // print this to bluetooth module
  }

}
Putting it all together
Program the Arduino and connect your phone app to the HC-06. Once paired, you should see a timer variable being incremented and pressing the checkbox should toggle the orange LED! If you have gotten this far, congratulations. This is a simple demo that does boring things, but you can expand onto this foundation to do fascinating this over a bluetooth connection like controlling motors, status updates, real-time debugging, etc. If you have any questions or comments please leave them below. As always you can find the code hosted on my github
Comments
BBCode Tags
| BBCode | Rendering |
|---|---|
| [b]bolded text[/b] | bolded text |
| [i]italicized text[/i] | italicized text |
| [u]underlined text[/u] | underlined text |
|
Auto link already enabled. |
http://example.org |
|
Auto image already enabled. |
 |
| [code=php]<?php echo 'Hello!'; ?>[/php] | |
| [quote]quoted text[/quote] | quoted text |
|
[list] [*]Entry 1 [*]Entry 2 [/list] |
|