My Experience with Embedded Linux using Yocto and Technologic Systems TS-4900 running a Qt Application
Jan 07, 2017 By justin bauer
This is going to be the first post in a little mini-series as I attempt to document my experience in using Technologic Systems embedded ARM platform, the TS-TPC-8390-4900, in creating a Qt QML based GUI. I will explain how I created a production-ready application that can be updated in the field, debugged, and cloned. Below is what this post will cover:
Relevant Articles
- TS-TPC-8390-4900 Wiki
- TS-TPC-8390-4900 Video
- Offical Getting Started Blog
- Building Yocto Image
- Compiling the Kernel
- Yocto User's Guide
1. Intro
I was tasked with getting a better solution to a companies HMI UI display. The current method was to use a Weintek 7" screen. This youtube video summarizes its restrictive programming enivornment and dated look and feel.
Enter Technologic Systems (TS). The two big players that offer Single Board Computers (SBC) seem to be TS and Boundary Devices. TS is located in Fountain Hills, AZ and Boundary Devices in Chandler, AZ. This is ideal for me since I live in Tempe, AZ. I've found that Boundary Devices has a significant community following and they are active in posting technical blog articles. Their Nitrogen6X board is also supported by Qt for Device Creation which shows a sign of popularity among embedded engineers. The popular BeagleBone Black shares some similarities between the two SBCs as well. The reason why I choose TS was that they readily provided HMI solutions with their SBC slapped on the back of a 7" or 10" touch panel. Here is an extremely biased review of the two companies:
Technologic Systems
Pro
- Cost effective, sells in bulk, 15+ year guarantee of availability
- Thorough wiki for existing tech savvy people, technical support is top notch (Thanks Mark)
- Convenient USB Blaster script for updating image
- Public Forum, however not really active for the iMX6
Cons
- Display sizes and resistive/capacitive options are limited to only a few
- LCD Failure issues in early models
Boundary Devices
Pro
- Large community support due to its popularity
- Custom displays can be integrated
Cons
- Off the shelf bezels look pretty, but not ideal for something that needs to be mounted.
- No models that offer enclosures for rugged applications.
An honorary mention is Reach Technology. They provide comparable hardware, however they do much more "hand holding" which means its easier to get up and running - yet more restrictive in the long run. For example, they provide an easy method in updating the boot logo by mean of a simple JPG copy/paste, but they don't provide a wiki on the inner workings of their hardware or how to modify their Yocto recipe. I tried out their G2C model years ago, but they didn't support Qt5.4 at the time so I dropped it in favor of more recent hardware that could support the newer Qt versions. This company may be a great idea for those that need help in getting a product quickly to market.
2. Getting the Basics
TS already provides an excellent Getting Started Guide that shows you how to get the basic matchbox terminal up as well as a Qt's default cinematic demo in X11. A few notes on my experience getting the basics figured out:
-
The quad core option will require a larger amperage power supply than their supplied 12VDC adapter (PS-12VDC-REG-2P3). I'm not sure why they recommend this despite the fact that the quad core will draw too much power too quickly causing a brown-out. This has happened to me multiple times with different units running a Qt application during its loading sequence. It depends on your applications stress on the iMX6, however to be safe I'd get a better supply.
-
I recommend using RealTerm instead of PuTTY since it has many more customizable options, but most importantly you can send files to the target system such as config settings for uBoot.
3. Boot Sequence
I needed a way to both 1) Update the ENTIRE system and 2) Update the Qt application. Below is the order of events that my system performs:
- Power-on-reset (PoR)
- U-Boot checks the USB ports if the USB Blaster script is present. I use this to update the entire image during intial production programming or in the field with a simple USB stick. If its present, it executes a
blast.shcustom script that will:- Format the eMMC into SLC Mode if it isn't already (will require a PoR afterwards)
- Use the
ddcommand to copy a previously cloned disk image from the USB onto the eMMC
- U-boot looks for the "SD Boot" jumper to deciede if it should boot to the SD Card or onboard eMMC, which is 4 GiG
- I use the SD Card to boot into and
ddthe entire eMMC into an image on the SD Card. This image can now be archived and given a version number for later uses in the USB Blaster
- I use the SD Card to boot into and
- Assuming eMMC boot, the kernel is loaded and boot logo is displayed. The user space is entered and a
mycustomstartup.shscript is run which lessens the LCD brightness, gets an IP address through DHCP, and looks for an attached USB that has a binary filename calledhmiApp.- If the application binary file is found, a custom Qt app is launched that shows an updating screen to the user indicating that their machine has been updated
- If no binary is found, a
run.shscript is run which exports a bunch of variables to launch the main Qt application in its full screen mode such as hiding the cursor and loading the touch driver.
- User can now use the main application after ~14 seconds of boot-up time.
3.1 USB Blaster
Use this handy tool to wipe your entire system and update any U-Boot variables. See their production page for more information on how to use the tool.
Since I am running my application using the EGLFS back-end, I actually need to modify the kernel command line that tells the kernel to not go into its screen saver mode after 10 minutes. This will happen upon default since the Qt application captures all user input and the kernel thinks that there is no activity. I can do this manually, or automatically load an env.txt inside the USB blaster tool. Here are the contents of this file. The only addition from the default is the consoleblank=0 portion.
cmdline_append console=ttymxc0,115200 ro init=/sbin/init consoleblank=0
bootdelay 1
Another addition that I will be adding to the default USB Blaster folder is a statically built mmc utility. This utility is used to format the eMMC into its SLC mode which guarantees atomic writes and data reliability. You will want this if your application is at risk of a power loss during any writes. Another safeguard is to make the root filesystem READ-ONLY and your application partition READ/WRITE. The eMMC is necessary to use since I will want to shutdown the touchscreen whenever I like without having to properly perform a shutdown. I could have opted to use an embedded UPS that is also offered from TS if I wanted to use the much larger SD card as boot medium. Without a graceful shutdown, the filesystem is at risk.It can be compiled from source, or you can download the quad core binary from here.
Lastly, the customized blast script can be found here. I've added a few lines to do the following:
- Retrieve the disk image that is already on the USB disk that was previously cloned
- Check if the eMMC has been formatted to SLC
- If it hasn't, invoke the
mmcutility to format and reboot
- If it hasn't, invoke the
- Use the
ddcommand and copy the disk image 1:1 to the eMMC. - Flash the on-board LEDs when it is complete.
3.2 Application Updater
Once the USB Blaster script is not found and U-Boot finishes loading the kernel, a custom startup script can now be created to launch in user space. The TS4900 wiki has since been updated from when I created my script using systemd. Below is the old script and how to make it run on startup:
case "$1" in
   start)
     # @see systemd staic config
     #ifconfig eth0 192.168.1.135 # get static IP
     udhcpc -i eth0 &
     echo 0 > /sys/class/graphics/fbcon/cursor_blink
     systemctl disable getty@tty1 #disable the terminal

    #attempt to mount external drive and look for potential upgrade binary
    mount /dev/sda1 /mnt/usb0
    if [ -f /mnt/usb0/hmiApp ]; then
      echo "Upgrade Initiated"
      /app/upgradeUtil -platform eglfs -plugin tslib #first run upgrade app
    fi
    /app/hmiApp -platform eglfs -plugin tslib #now run main application
     ;;
   stop)
     # if you have anything that needs to run on shutdown

     ;;
   *)
     echo "Usage: customstartup start|stop" >&2
     exit 3
     ;;
 esac
touch /etc/init.d/customstartup
chmod 777 /etc/init.d/customstartup
#then to have this run on startup:
update-rc.d customstartup defaults
This attempts to get an IP using the DHCP server and pushes it to the background. It also gets rid of the blinking cursor and disables the terminal since the Qt app will be launched full screen. It then mounts the USB (if any) and checks if a certain file is present. If it is, then a custom Qt upgrade application is launched. If not, then the regular Qt app script is run. The upgrade application is fairly straightforward - it merely shows a splash screen showing the user "Hey, something is happening here" and copies the necessary files from the USB onto the eMMC. Notice how the application stuff is inside a folder called app. This is actually a separate READ/WRITE partition.
3.3 Application Run Script
This script is called last which exports a few DEFINES so that the app runs correctly. Most of these can be found Qt EGLFS embedded linux info page. Please note that I was not able to get the TS touch screen working properly using evdev. As a hack, I intentionally export a bogus location for the evdev touch driver so that I can load the tslib driver. You will need to remember to add tslib to your Yocto configuration file so that the necessary binaries are available in the system.
#!/bin/bash

echo "Launching HMI Application"
export QT_EGLFS_IMX6_NO_FB_MULTI_BUFFER=2
export FB_MULTI_BUFFER=2
export QT_QPA_EGLFS_HIDECURSOR=1
#ignore evdev handeling of touch so that tslib works
export QT_QPA_EVDEV_TOUCHSCREEN_PARAMETERS=/dev/input/bogusss
export QT_QPA_EVDEV_KEYBOARD_PARAMETERS=grab=1
export QT_QPA_EVDEV_MOUSE_PARAMETERS=grab=1
export TSLIB_TSDEVICE=/dev/input/touchscreen0 #this is also set in /etc/profile.d/tslib.sh that is executed upon login
# Lower backlight brightness. Range is 0 -> 8
echo 6 > /sys/class/backlight/backlight_lcd.29/brightness


/app/hmiApp -platform eglfs -plugin tslib
4. Partitions
I created two partitions. One as the bootable file-system as READ-ONLY (ro) as 1.6GiG and the other 150MB application partition as READ-WRITE (rw). I did this to avoid any potential writes to the root filesystem during a power outage, however the eMMC in SLC mode should still be able to recover from this. I did this step as an extra precaution plus the filesystem should not be modified anyways in the field. The eMMC once formatted, is only 1.9GiG. The default image that TS provides is ~1.1GiG in size including X11.
Simply use fdisk to create two partitions. These will appear as emmcblk2p1 and emmcblk2p2 once mounted. Create an /app directory and edit the /etc/fstab file to mount the smaller R/W parition onto the /app folder. This is where the Qt app and any associated files will reside such as your sqlite database file.
4.1 Mounting an Image with Multiple Partitions
To mount an *.img with multiple partitions, such as the one I created with 2 of them (one for filesystem and one for application):
parted myimage.img
(then press 'u' and then 'b' then 'print')
Number  Start        End          Size         Type     File system  Flags
 1      1048576B     1469054975B  1468006400B  primary  ext4         boot
 2      1469054976B  1933574143B  464519168B   primary  ext4

# (now exit parted) (Be sure to strip out the 'B' in the offset value!)
# mount -o loop,offset=1048576 v1.2.0.img /mnt/disk1
# mount -o loop,offset=1469054976 v1.2.0.img /mnt/disk2
(source)
There is an alternative way of doing this as well if you want to use the folder explorer:
5. Kernel
The kernel needs to be recompiled if you want your own custom boot logo over the default TS one. Unfortunately, this is the only way and you will need to keep track of your build. To update the boot logo, follow these directions and once downloaded, rename your logo logo_user_clut224_ascii to logo_user_clut224 and then copy over the custom made logo_user_clut224.ppm to the kernel/linux-3*/drivers/logo/ directory and compile!
You may also want to use menuconfig to remove any unnecessary kernel modules and features that don't need to be loaded to help the boot time.
6. Yocto
The most confusing and frustrating part of getting your application running is using Yocto. The official TS wiki already provides a great section on building Yocto, however adding features and removing them seems to be a guessing game. Whether or not it successfully builds is 15% skill and 85% luck. You may encounter compilation errors due to an erroneous checkin by someone since the packages are taken from upstream github trunks and various branches. A recompilation 24 hours later may solve the problem.
If you are going to use EGLFS, please follow the Wandboard wiki in how to properly remove X11.
7. Random Notes
7.1 X11 vs EGLFS
The default file system contains X11 and you may not want to use this. I migrated to EGLFS due to its smaller footprint size, but most importantly because of it got rid of the tearing. There are numerous bugs reported of this issue and as of 2017 I have not seen any fixes up to Yocto Dizzy release.
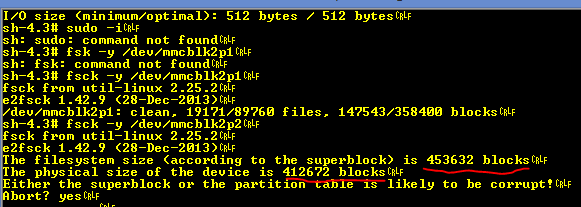
7.2 eMMC sizing discrepancies
The TS-4900 had its eMMC size fluctuate slightly by a few MB depending on the lot. These size discrepancies were seen between April 2015 and November 2016. Older images that are formatted to larger sizes than their physical memory will fail. You can easily see this when the terminal boots into emergency maintenance mode:
April 2015
https://web.archive.org/web/20150414190015/http:/wiki.embeddedarm.com/wiki/TS-4900#eMMC_2
mmc write_reliability set-n 0 /dev/mmcblk2
mmc enh_area set-y 0 1888256 /dev/mmcblk2
November 2015 http://wiki.embeddedarm.com/wiki/TS-4900#eMMC_2
mmc write_reliability set-n 0 /dev/mmcblk2
mmc enh_area set-y 0 1847296 /dev/mmcblk2
You must mount the image archive and make the 2nd partition SMALLER so that it fits on the slightly larger and smaller eMMCs. This is no problem since the 2nd partition is around 400MB big and the app only needs about 30MB. Follow this guide to make it smaller: https://softwarebakery.com/shrinking-images-on-linux
7.3 Static Qt Boot
Build your Qt app statically so that you don't need to worry about updating the entire system to support later release of Qt. I wasn't able to properly compile Qt source statically without a compilation. The bug can be followed on Yocto's tracker here.
Comments
BBCode Tags
| BBCode | Rendering |
|---|---|
| [b]bolded text[/b] | bolded text |
| [i]italicized text[/i] | italicized text |
| [u]underlined text[/u] | underlined text |
|
Auto link already enabled. |
http://example.org |
|
Auto image already enabled. |
 |
| [code=php]<?php echo 'Hello!'; ?>[/php] | |
| [quote]quoted text[/quote] | quoted text |
|
[list] [*]Entry 1 [*]Entry 2 [/list] |
|